Last year, you saw a lot from us about implementing and successfully performing building information modeling (BIM) workflows in Vectorworks Architect.
To review, check out the steps in this graphic:
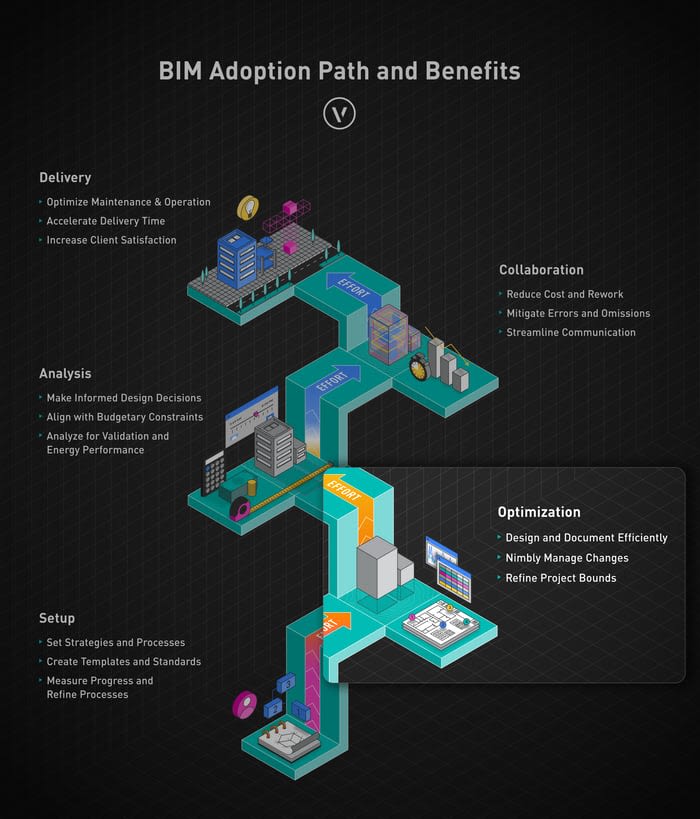
One important callout is that BIM requires less effort than you might expect the further you are along the project delivery path — i.e., the more effort you put in up front, the more it pays off long term. You can see how the arrow fades in color as it moves through the BIM journey, indicating the level of effort required at each stage.
Today, we’ll be focusing on the “Optimization” section of the graphic. You’ll read about plenty of clever tricks and features that allow you to simultaneously improve your BIM process and set it up for scalability in the future.
→See why Vectorworks Architect is the BIM authoring tool you need.
Templates… The Answer Is Templates.
If you’re looking for a time-tested way to ensure your BIM success, you guessed it! Templates are your best friend. They help ensure every project’s files are set up in a clear, logical way without spending too much time doing it each time you begin a project.
Almost any design program comes with the ability to start a project with a template. This is perfect for BIM. Putting in the work to develop your own BIM template saves you tons of time in the future.
You might notice that templates appear in the “Setup” section of the infographic, because it’s a crucial aspect of preparing your BIM adoption path. We’re going to address templates here in the Optimization part as well, because they really are an important part of optimizing your BIM process!
Creating that first template can take a little bit of know-how, but it’ll pay off tenfold — you frontload a typical project’s organization structure so that when it comes time to do a project with real stakes, you’re not rushing or making hasty decisions. Everything is already set up for you. You’ll want to reach back in time and give your template-creating self a high five!
There are three ways to approach creating your first BIM template:
- Customize a built-in Vectorworks template, or
- Convert an existing project to a template, or
- Create a template from a blank Vectorworks document
Customizing Vectorworks’ Built-In Templates
Vectorworks comes with pre-formatted file templates that are ready for use. You can use these templates by selecting one from the pop-up that appears when you start a new file. There’s a variety of template options available to use based on your needs.
The next two images show the Organization dialogue (Tools -> Organization) for an empty file in which the “Architect (Imperial).sta” template was selected. You can see that there are pre-defined design layers and stories ready for you to use.
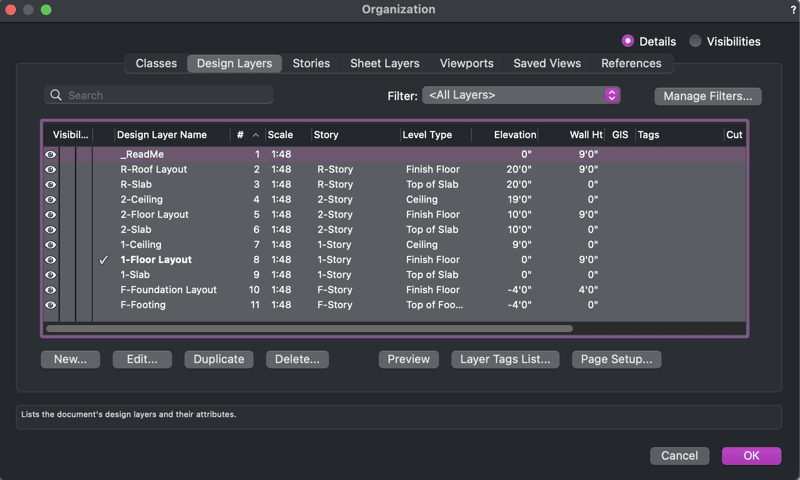
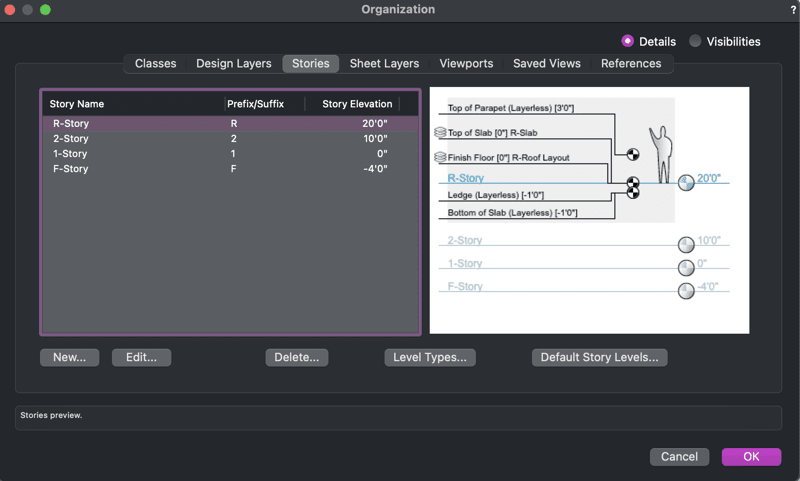
These templates have a basic class and layer structure as well as some preformatted sheet layers for output and presentations. Examine the templates and revise one to how you and your team work best. You can save any Vectorworks file as a .STA file, the format used for templates in Vectorworks. You can do so by clicking File -> Save As Template.
Converting an Existing Vectorworks Project to a Template
Have a completed project that went well? Use that project as the basis for templating future projects. All the work is already there — you just have to remove the actual design so that the file’s framework and resources are what remain. Then you save it as a .STA file. Ta-da!
Creating a Template from a Blank Vectorworks Document
The most intensive option, but one that can be incredibly effective. It starts with asking yourself: In an ideal world, what would I like to have in my Vectorworks file when I sit down to design?
Common considerations are layers, classes, drawing labels, smart markers, text styles, hatches, title blocks, and really any resource that you envision yourself using on most of your projects. Once you have them set up, you can save as a .STA file.
About Classes and Design Layers in Vectorworks
Classes and design layers are a crucial part of your design file, so it’s important to give them some thought.
As a reminder: classes are the what, while design layers are the where.
Having a class for furniture, for example, allows you to toggle visibility to see what the model looks like with and without furniture.
It’s recommended to set layers up vertically — i.e. floor one above the slab, floor two above floor one, and so on. Do this by setting the layer’s elevation in the Organization dialogue. This method will automatically generate layers at the correct height for you.
Taking Advantage of the Navigation Palette
There are tons of neat tricks you can do with the Navigation palette depending on your needs.
Recommendation: use the Navigation palette to create several Saved Views that you can quickly switch between. To continue the example from the previous section, you could create a Saved View of the main floor with furniture and one of the main floor without furniture. Then you’ll just have to click once to navigate between these views. It’s like opening a novel to a bookmarked page with highlighted text!
Focus on Using BIM Tools!
There are many tools in Vectorworks Architect that were designed for the BIM process. It’s important to use these tools when you’re modeling or drawing because they’ll save you tons of time in the long run.
Firstly, here are a few tools that are considered “BIM tools:”
- Spaces
- Walls
- Slabs
- Doors
- Windows
- Roofs
The following are some of your basic drawing tools that aren’t considered “BIM tools:”
- Polylines
- Lines
- Rectangles
- Circles
- Polygons
By drawing and modeling with BIM tools, you’re setting yourself up to make documentation simple and painless. Just select one of these BIM objects and its quantitative data — size, shape, location, etc. — appears in the Shape tab of the Object Info palette. More qualitative data and customizations are available in the Data tab of the OIP. You can quickly pull information from these records into schedules later as you’re preparing your documentation.
Automatic Updates - Synchronization Across Your Design File
These BIM tools save time and allow you to stay in your creative flow when you have to make revisions. Sheet layers and the viewports within them are coordinated with the model, so you can edit with confidence knowing that the revision will automatically reflect across the file and that your project’s framework removed a ton of potential manual revisions.
Object Styles
Object styles are more of a result of BIM tools than BIM tools themselves. They’re essentially object templates — you know how much we love templates — that allow you to reuse your favorite geometry.
Many architects save styles for recurring elements like windows, walls, doors, or slabs. Instead of designing it again from scratch each time, you can simply use your already-made style for that particular object. The object will have data pre-populated, so it’s easy to document in a worksheet.
These objects are editable by instance so you can customize your standard resources to fit the specific needs of a project. And if you need to make a sweeping change to all instances of the object, that’s easy, too.
Smart Markers and Data Tags
Smart Markers and Data Tags take your construction documents to a whole new level with intuitive coordination that offers you a high degree of quality assurance in the internal drawing coordination process.
You can think of Smart Markers as coordination labels for your drawings. Introduced in Vectorworks 2020, “Smart Markers” refers to the variety of callout tools found in the Dims/Notes tool palette. It includes tools like:
- Detail Callout
- Reference Marker
- Drawing Label
- Section Elevation
- Interior Elevation
- Title Block Border
- Data Tag
These markers are all graphically customizable, so you can edit them to meet yours or your firm’s drawing standards.
They’re called “smart” because they’re inherently linked with their associated model element, viewport, and record format. The takeaway here is substantial — because of this coordination, making a change in the model, a viewport, or a record format will make that change across your entire file! Take advantage of Smart Markers to eliminate the need for tedious manual revisions.
Though all these callout tools are helpful for your BIM process, you’ll definitely want to familiarize yourself with Data Tags.
A Data Tag displays data associated with drawing objects. The data can be general parameters like height, record fields like a model number, or even IFC data. You can also use the tool to add simple labels that aren’t linked to geometry, like a date stamp.
Data Tags are yet another instance of capitalizing on the benefits of having well-defined templates and object styles. Having objects with pre-defined data allows you to simply insert a Data Tag to mark your drawing and all the information is already there for you, saving you time.
The Resource Manager comes with many Data Tags ready for you to use. You can also create a custom tag and save it as a template for future use.
→Learn more about how to use Data Tags in Vectorworks Architect.
Evolving Projects' Levels of Development
As you think about optimizing your BIM process, it’s important to keep in mind that Vectorworks Architect is designed to help you evolve a project’s level of detail concurrently with the progression of the project itself. The software embraces the commonality of typical Levels of Development (LODs).
This means that you shouldn’t worry about modeling and detailing every single part of the project in the early stages of the design process. Some worry about BIM because they think it means painstakingly drawing everything possible right at the start, like door hinges or handrail details — you only need to draw and detail what’s necessary for the level of information need at the active design phase. What exactly is necessary, though?
It should be defined in the project’s BIM Execution Plan (BEP). You save yourself a lot of stress by adhering to what’s needed to deliver at that phase. It’s best to focus on doing a great job on these elements rather than spreading yourself thin on superfluous tasks!
More On BIM Optimization with Vectorworks Architect
Itching for more information on optimizing your BIM process? As always, Vectorworks University is a fantastic resource for learning about the software with real examples.
The webinar “Streamlining Workflows for Data-Driven Documentation” by our industry specialist Sarah Barrett is a great place to start. Click below and she’ll walk you through standard BIM practices and plenty of nuances to help you be more efficient.
Stay in the know with the latest insights
Subscribers receive news, customer stories, success and learning tips, event information, and other important announcements form Vectorworks.
By submitting this form, you agree that Vectorworks, Inc. and its authorized partners may contact you in regards to news, offers, and the use of our software, services, and platforms. Learn more about our privacy practices and your data on our privacy page.*