.svg)


This blog is written by Damian Keeley, a UK-based architect with over 20 years of experience and his own firm, Size Architects.
. . .

The AEC industry has evolved from a 2D CAD workflow as it did from Rotring pens and trace layout sheets before. The industry has been rapidly moving towards data-rich BIM adoption as a standard for some time now — no longer is 3D modeling seen as one of the dark arts and reserved for visualizers producing artist impressions and renders. Workflows have opened and improved, and so much more is available now. Efficiencies of speed and scale and improvements in consistency and quality are more readily available than ever before.
This blog signals a return to basic principles; as an architectural practitioner, I can create a fresh set of tools and output deliverables and documents to use daily, all while continually developing my typical file template. I’ve chosen to blog about the process, to share my 20 years of experience as an architect who cut his teeth on hand-drawn and 2D CAD, emerged through years of so-called 3D “dumb CAD” for visualization purposes only, and into data-driven BIM workflows over the last decade.
Where to Begin with Setting Up Classes?
I believe that required deliverables define our workflows. If we consider how we'll be working, we can make more informed decisions as we set up our project files. We can review what these deliverables will be in due course. For now, assume a typical project will have a series of typical outputs, including existing and proposed floor plans showing demolitions where necessary, coordinating sections and elevations, and some quantities scheduled for doors and windows.
It's certainly possible within Vectorworks to produce materials and quantities takeoffs, construction schedules, specifications, and the usual construction detail drawings — and so one of the best places to begin working towards creating and controlling these deliverables is classes. I will be developing a workflow to use in both existing and new buildings throughout this series.
RELATED: “GETTING STARTED WITH TEMPLATE FILES”
By default, the Vectorworks file I open on my desktop by clicking "Create New File" has only two classes: "None" and "Dimensions."
"None" is useful for modeling 3D or drawing 2D objects in the conceptual stages. I use this class to get ideas onto the page. Anything drawn in "None" should be re-assigned to its correct class once completed.
"Dimensions" is the default class that Vectorworks creates dimensions in, and should remain, although Dimensions created on that default class can be re-assigned to other classes as necessary.
We'll need to create some new classes to make our file useful. To add a new class:
- Click on the classes button in the toolbar at the top left of the screen.
- Click on the "New..." button to create a new class.
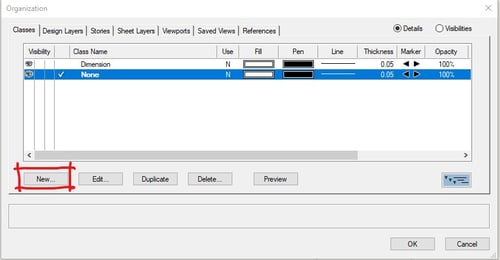
- When you click "New…" you can "Create a New Class" or import classes to predefined standards like ISO 19650. We'll then use a feature of naming classes within Vectorworks that helps us organize our list of classes by using a name with a hyphen (-) that helps us to group the classesin our viewer.
- The classes I suggest here let the projects file set up be used during the various stages of work on a typical, small renovation project, such as demolitions, with those works happening prior to new build parts and proposed alterations, such as “Arch Elements-Wall Existing,” “Arch Elements-Wall Demolition,” and “Arch Elements-Wall New.” I should mention at this stage, that additional techniques such as applying Phasing Records to objects and using data visualization are also very useful techniques for delivering multiphase renovation projects, which I might cover in a later blog.
I then entered the class name and clicked "Edit Properties after Creation" to choose colors, hatches, and pen weights. Typically, when I draw, I tend to use the attributes box to be set to "Color by Class," "Set Class Thickness," "Use Class Style," and more.
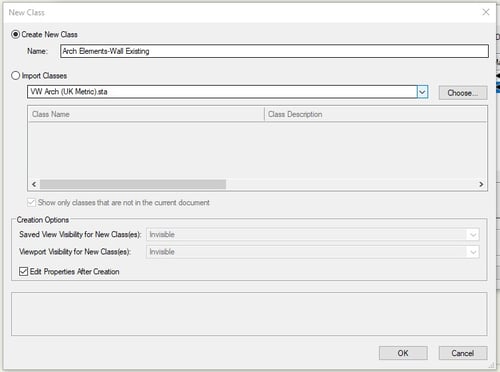
Clicking "Okay" brings up the edit classes dialogue box. For the Graphic Attributes, tick the box "Use at Creation" to make sure these settings are imported when you switch to start drawing in any particular class.
I'll use a hatch of diagonal lines for existing walls and set the pen thickness to 0.5mm.
Describing Existing Structures within Your File
At the early stages of a project, it makes sense to describe existing walls and structures with simple fills or hatches. This is because we sometimes don't have knowledge of what's contained beneath existing wall and floor surfaces.
Until we know this data gathered from a proper survey, it's best to generally just show it in its bounding dimensions and mass and fill in further detail accurately only as it becomes available. This saves you from assuming it’s a cavity wall, for example, when it might just as easily be a solid masonry wall.
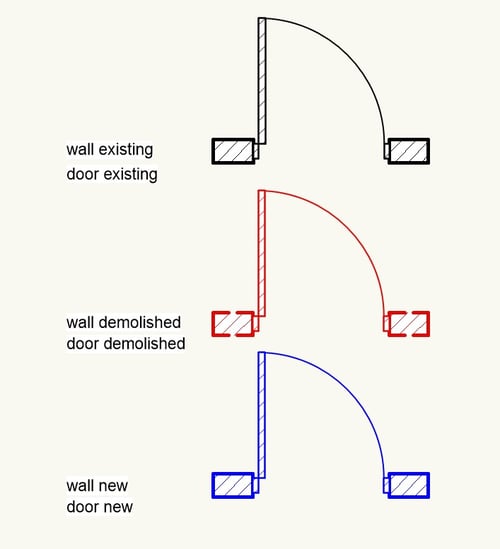
It's beneficial to show new structures to clearly differentiate between existing (retained) and non-existing (demolished). I usually use a red hatch for the demolition and a dark blue hatch for the new one.
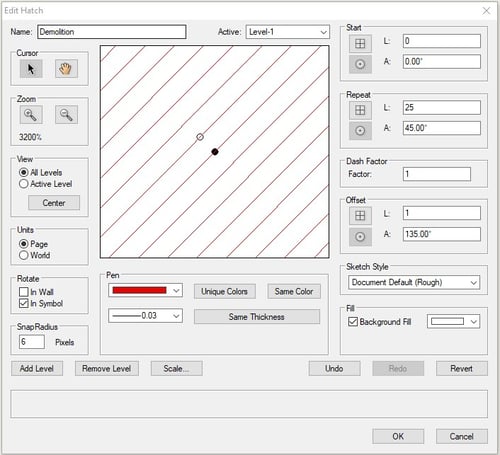
To alter hatches, we'll need to use the Resource Manager. Show this by going to "Window>Palettes>Resource Manager." You can then navigate the file and find the Brick HF hatch. Right click on the Brick HF and create a duplicate. Call the duplicate "Demolition" and, once it's created, right click on it and select “Edit” and change the pen color to red to create the contrast between the hatches.
Then repeat the process, and create the hatch called "New" and change the pen color to dark blue. For consistency, I also duplicated the Brick AF hatch, created a copy with black pen color, and renamed it "Retained.”
I'll use these concept-level hatches during the early stages of creating my building elements of walls, slabs, roofs, and more to get the model underway quickly. This simplifies the process and allows us to start modeling our custom files without additional setup and delay.
Once we understand what walls and slabs are made of, we can swap these out for composite elements that correctly show component parts and thicknesses of various materials. But for now, we'll assume that we don't yet know for certain what these elements are made of, nor do we know for certain what the new elements will be made of. We'll be using a generic concept level drawing style until we develop the design in detail.

The Importance of Classes for BIM
So that’s how you can create new classes for specific purposes in Vectorworks.
The classes I’ve chosen to add to this blog post allow for drawing an existing building or structure, including any demolitions and any new build elements. We control this workflow by having various building elements with "new," "demolition," and "existing/retained" for simplicity.
For example, we have:
- Arch Elements-Wall Existing
- Arch Elements-Wall Demolition
- Arch Elements-Wall New
The use of the dash in the name is helpful to group classes together under a standard heading to make turning on and off classes and grouped sections of classes much simpler.
It's much easier to find what you’re looking for in the drawing when using these clusters of classes.
So, we’ve now succeeded in setting up a handy section of the project template file and using some classes that will be useful as we model our buildings going forward.
For more on model setup, click the button below:

. . .
More About Damian Keeley
I work at Size Architects, based in the UK. I specialize in residential projects, including new-build, conversions, and adaptations to existing building fabric and structures.
In setting up a new suite of practice documentation, I will blog what I have learned and discovered through file and template creation and the practicalities of using BIM platforms daily.
I’ll also share the techniques, processes, and tools that help me adopt workflows that simply work, avoid confusion, and pair back the unnecessary jargon. Stay tuned for more blogs!
