.svg)


Let’s continue our exploration of industry-specific functionality in Vectorworks 2024. This time, we’ll examine features and updates for the landscape industries.
Landmark Color Palette
Vectorworks Landmark 2024 brings you a dedicated color palette to provide an efficient nature-focused color selection experience. You'll be able to quickly access the colors you need to clearly communicate your design intentions, saving you time and letting you focus on your design.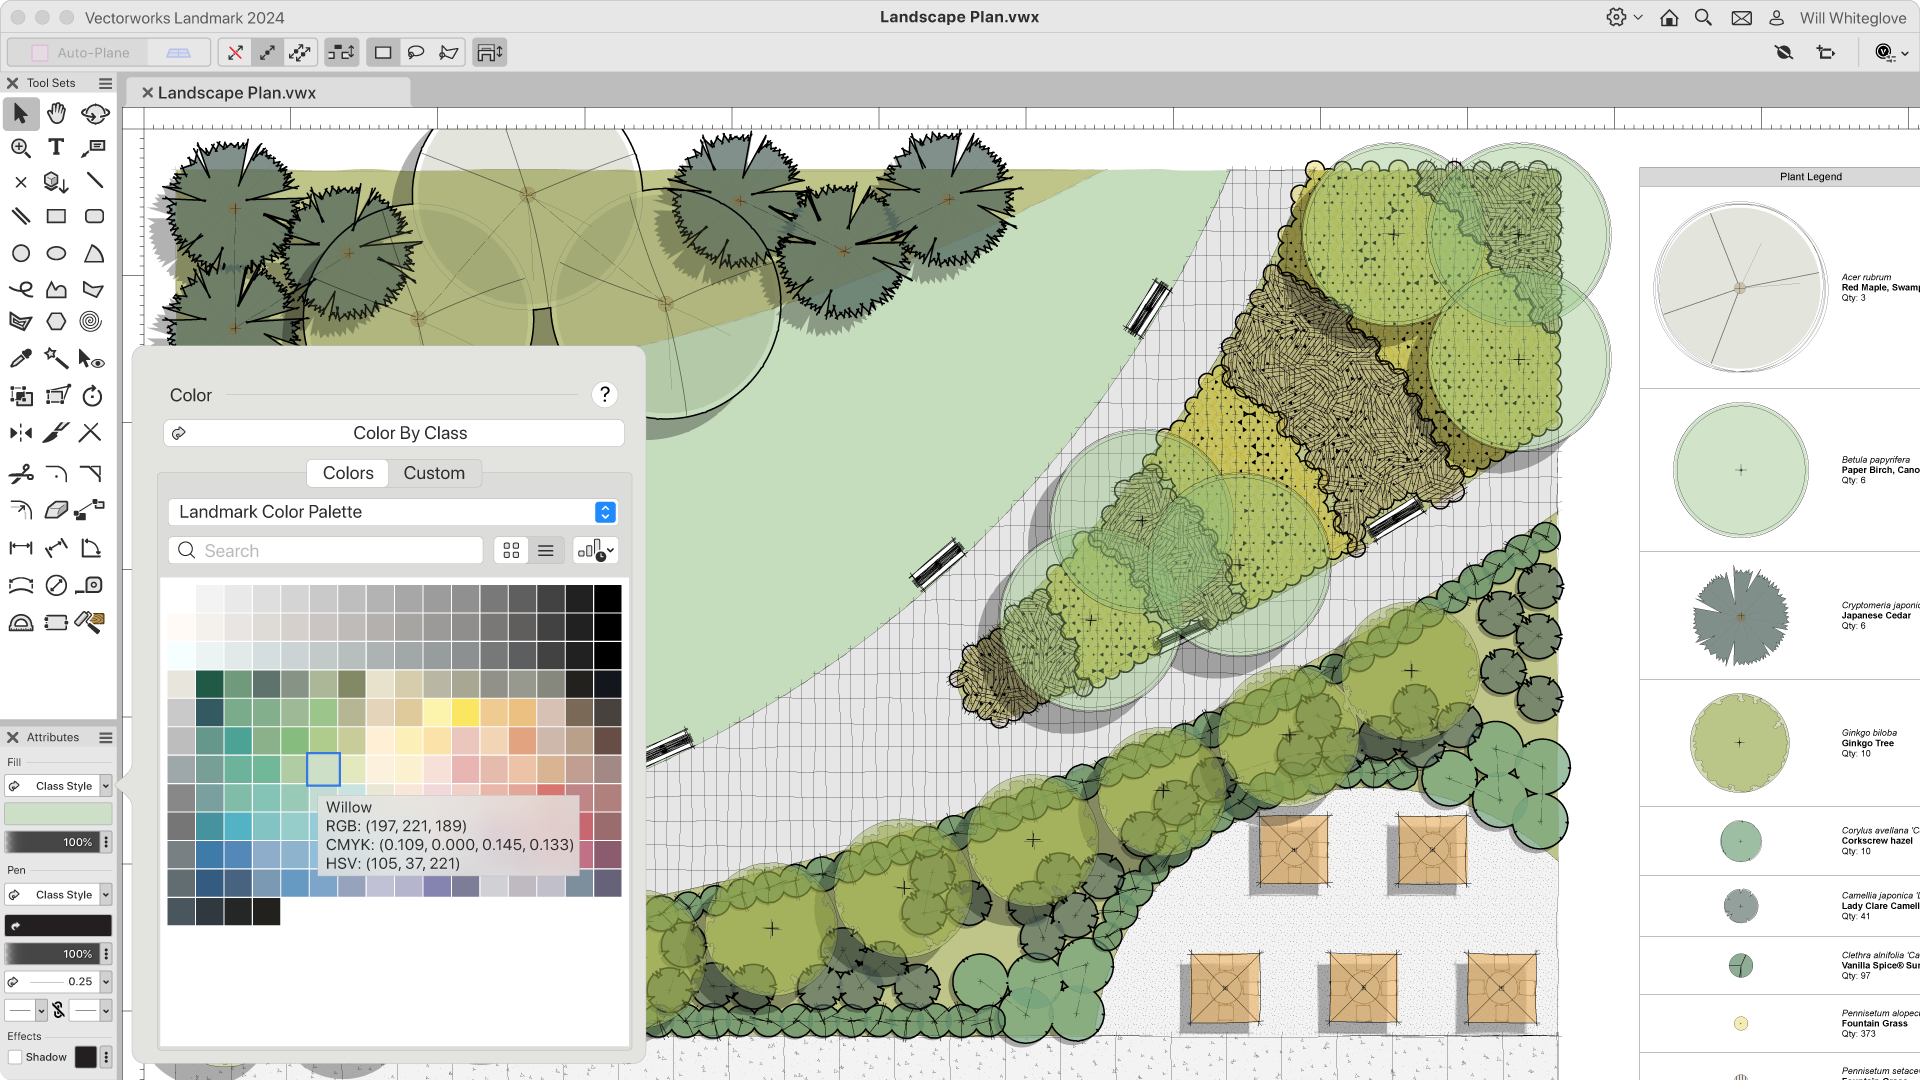
New Automated Fence Tool
Say hello to the new, automated Fence tool! Optimized for simplified and detailed representations, the Fence tool supports integrated posts, gates, and terrain-conforming options like raked or panel/stepped.
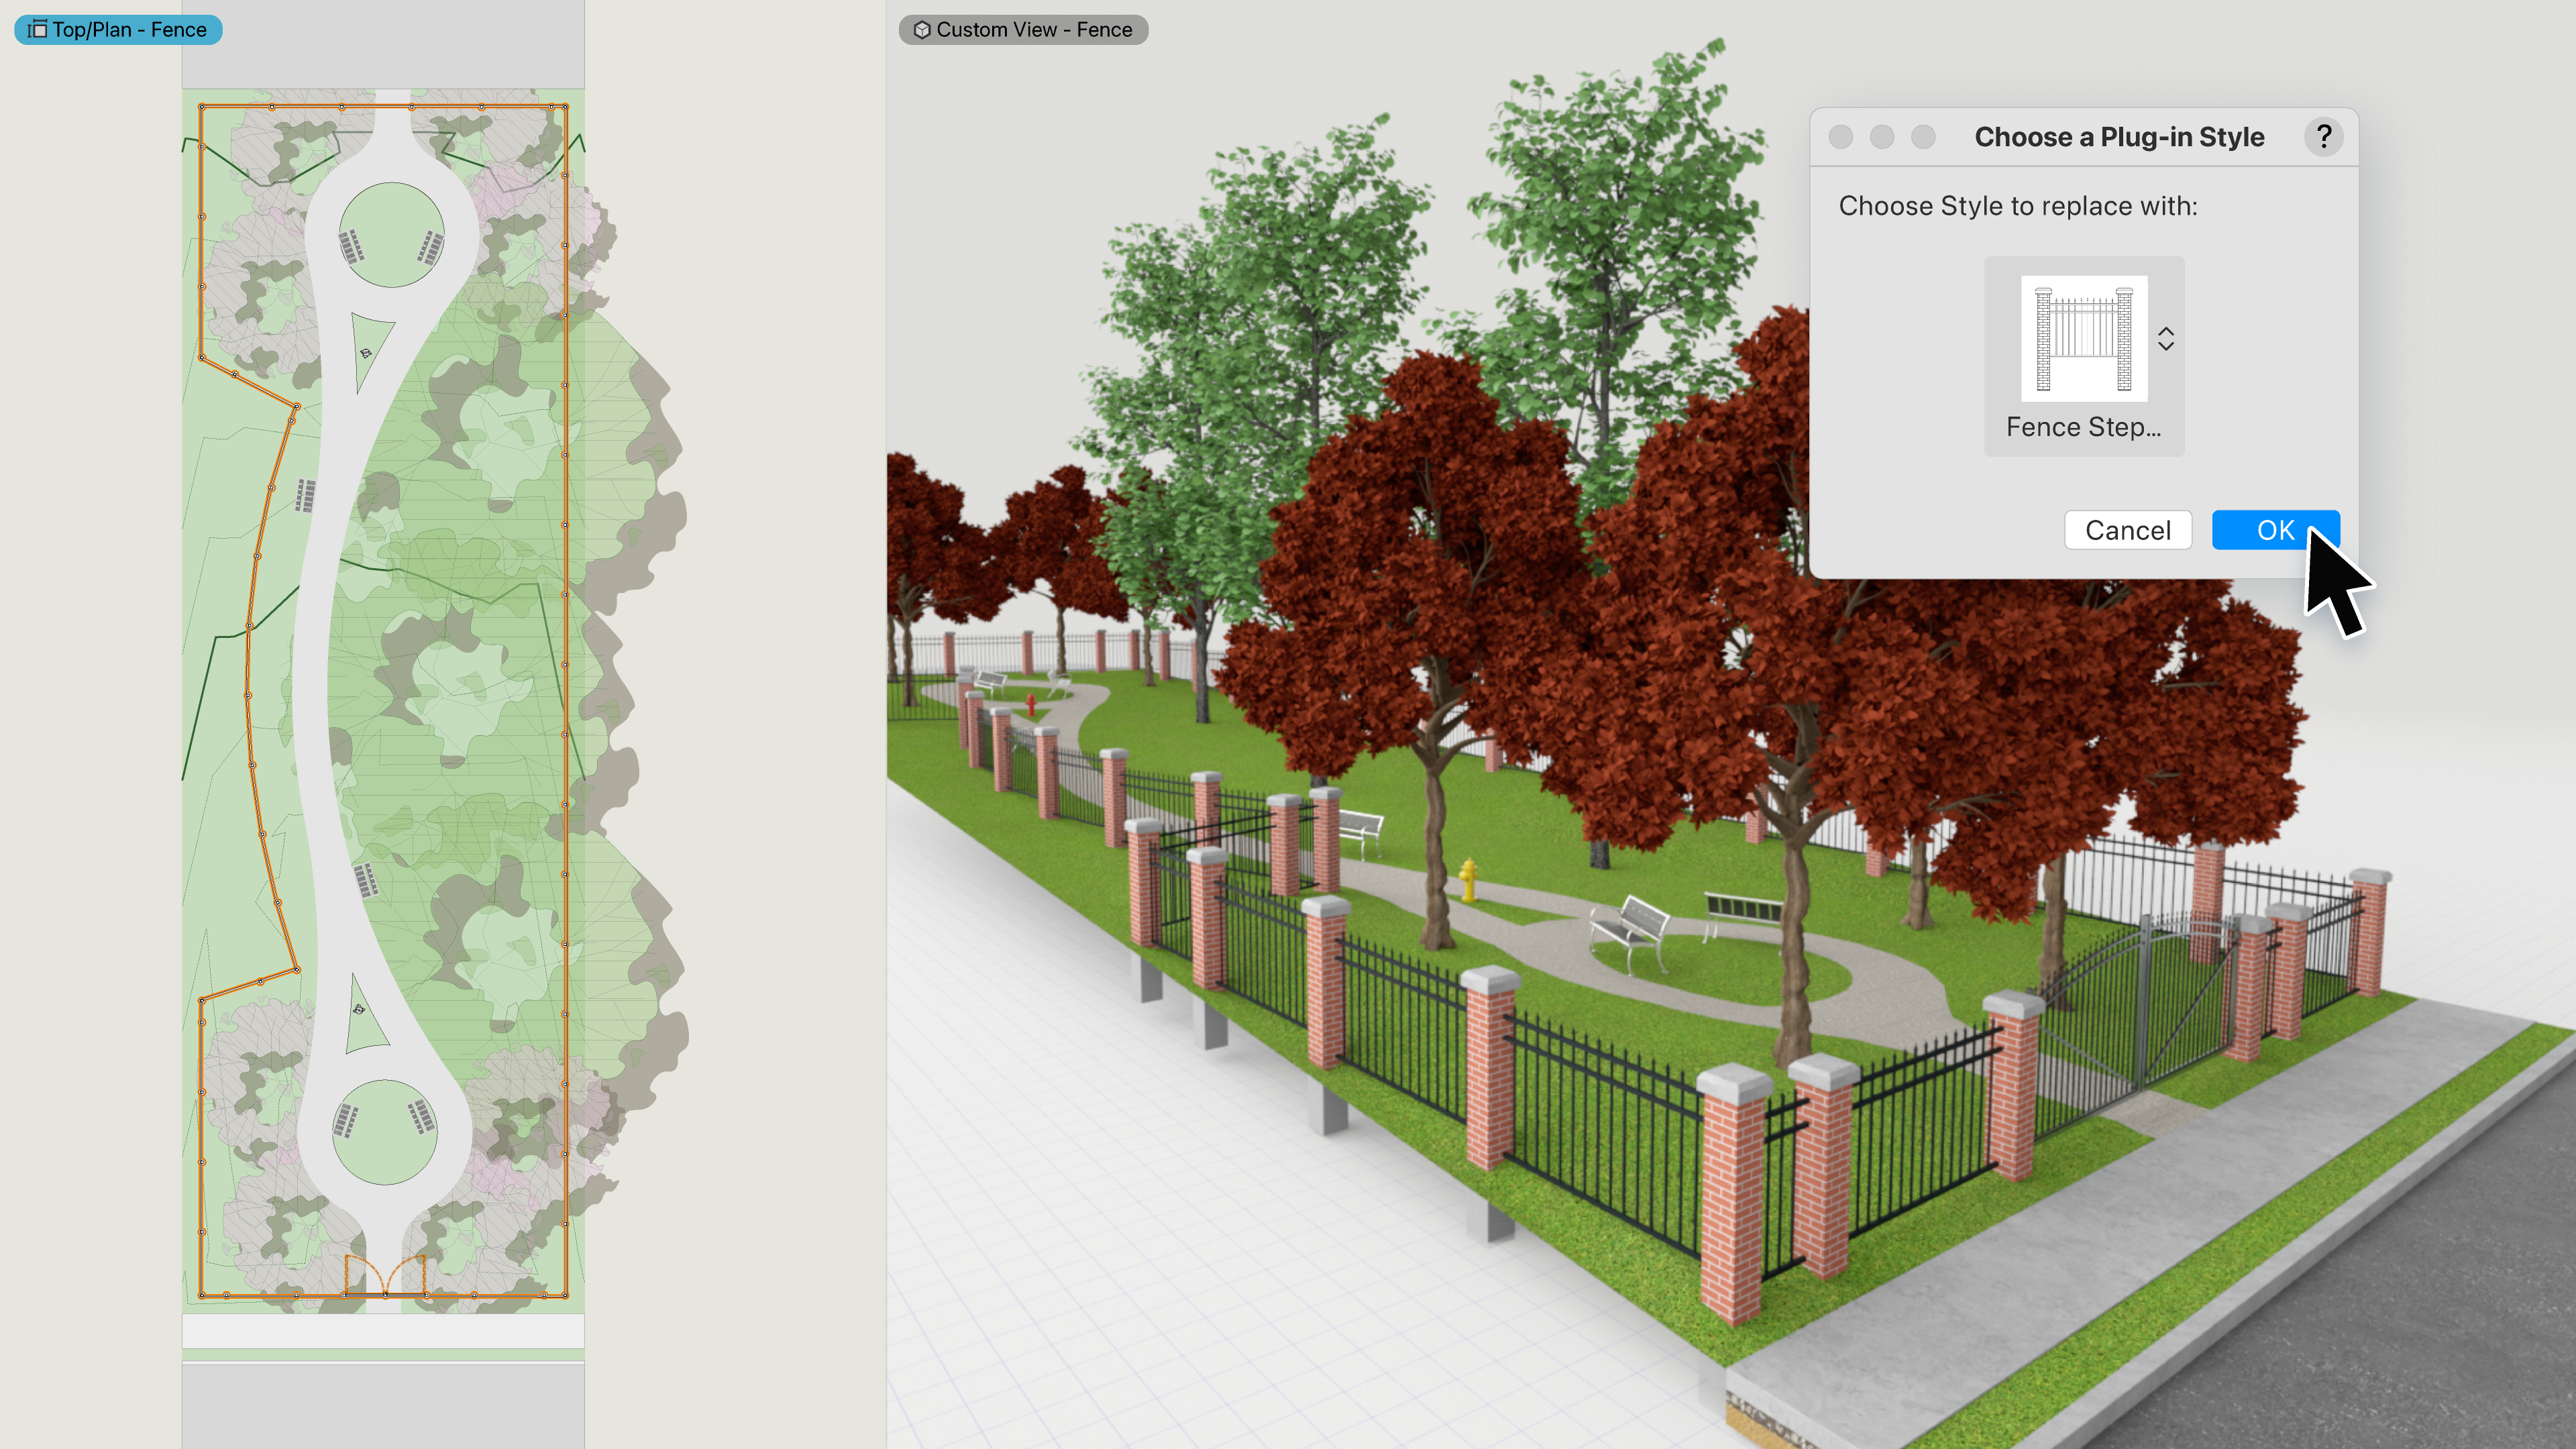
The Fence tool will save you significant time while designing in 2D and 3D, and also allow for accurate material reporting, reducing the chance for errors in material specifications.
Tips & Tricks for the Automated Fence Tool Workflow
If you incorporate fencing in your design projects, then the Fence tool’s automated workflow is developed for you to efficiently design preconfigured and custom fences, in both 2D and 3D, and it’s suited for any industry supported by Vectorworks’ Design Suite products.
One of the first things you’ll note about the Fence tool’s intuitive interface is how similar it is to other smart object tools. The mode bar provides immediate access to available preconfigured fence styles through the resource selector, the familiar polyline placement modes, and the fence tool’s preferences to adjust the tool’s settings.
Let’s review some other important aspects of this feature:
- Fence objects can be placed in either 2D or 3D working environments and be represented dynamically in both.
- These objects are surface-aware, which means they'll automatically follow site model surfaces, or with Gravity mode, they can follow surfaces of any 3D object, including hardscapes, landscape areas, slabs, and walls.
- Fence objects automatically facet to the designated post spacing when drawn in a curved path, which is a tremendous time-saving feature.
- Once you have initially placed your fence system, flexibly adjust or customize it using the familiar Reshape For example, to accommodate an entry way, you can add, remove, and adjust the position of the posts, to make way for a gate. Then, simply add a gate by selecting the gate mode and choose where the gate should go, making it easy to place as many gates wherever needed.
”General” Tab
- You’ll note the opportunity to change the 2D and 3D levels of detail. This can be very useful in moving from schematic design to design development and construction document phases, or to present your proposed fence design with as much detail as you prefer.
- Another general setting is the overall fence configuration, which can quickly switch to be raked or stepped.
“Posts” Settings
- In Posts settings, you can accurately adjust your fence installation for each project. For example, if you know the panel span is meant to be shorter than the default, you can quickly change this, as well as modifications to the post height above ground and depth below ground. As you would expect, this automatically changes the overall post length, reducing errors found with the material order once installation begins.
- Specifying the footer for every post is as easy as picking its shape and size.
- When framing fences, rails are critical to its longevity, and since conditions can vary, so should the railing specifications. Fortunately, changing the number of rails, their type, and their profile dimensions is easy in this dialog.
“Attributes” Dialog
- The best location to customize fencing materials is through the Attributes dialog, within the Fence settings…here you can use class settings for each fence part, or use assigned material settings. If your eventual goal is to report not only the parts, but their materials as well, it will be worth the short time spent assigning these attributes.
Site Model Analysis Legends
With the latest improvements for site model analysis, you'll have better control over the graphical output of your site model snapshot with the ability to include a legend to help clients understand color values including elevation and slope.
With a highly customizable color scale, you can reference all the relevant information about your slope ranges and elevation values. Additional settings allow you to display customizable site model data, perfect for reference or comparative analyses. You'll be able to visualize data more easily so you can effectively make and communicate design decisions in a timely manner.
Tips & Tricks for Site Model Analysis Legends
Firstly, to access this feature, simply adjust your site model settings to the desired visual output. Then, in the Object Info palette, click “Create a snapshot.”
This will generate a Site Model Snapshot where you can toggle the Legend on and off, adjust its opacity, give it a title, assign the Legend Title and Intervals to classes with customized text styles, and toggle the order of the intervals in the Legend.
For elevation analysis, you can adjust the contour intervals within the Site Model Settings to display different ranges of elevation in your legend.
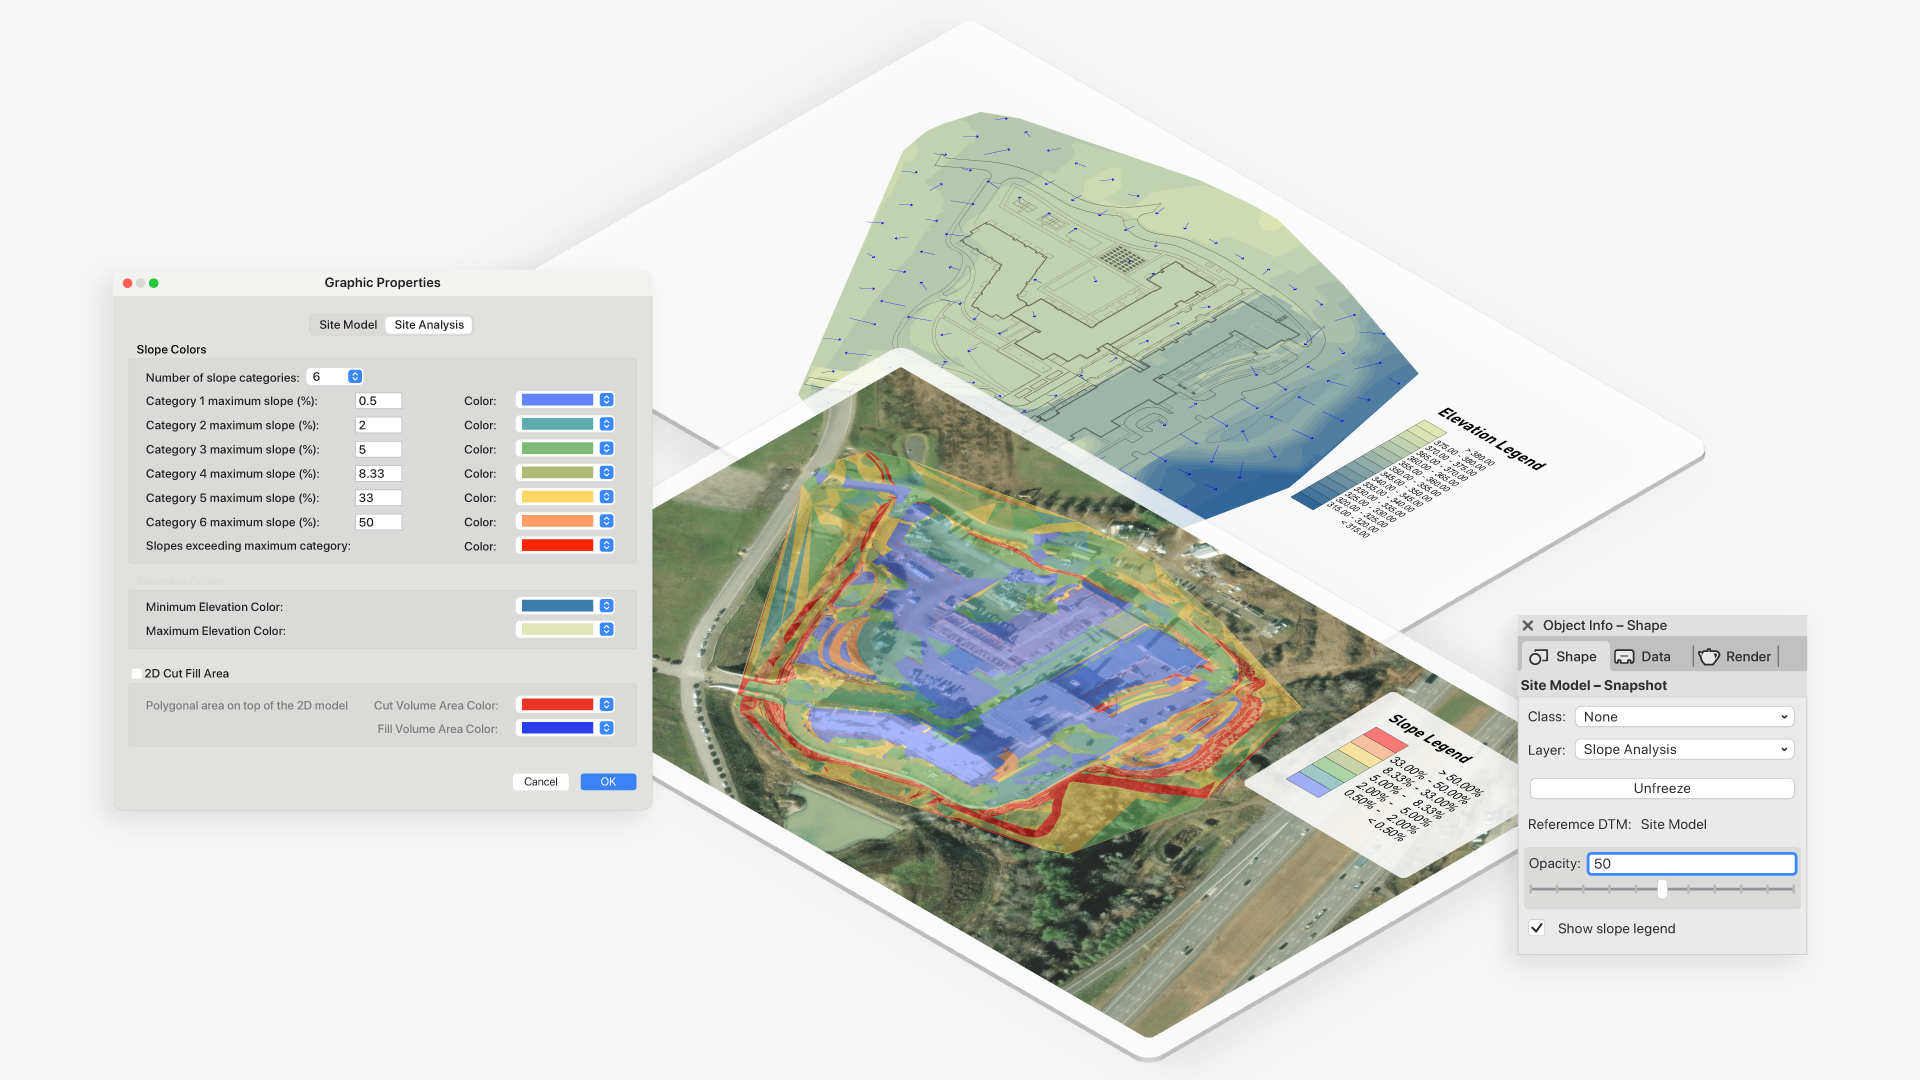
You can also adjust the minimum and maximum elevation colors within the Graphic Properties to create the graphic style you desire and, with the option to display flow arrows, you can gain valuable insight into where water drains on site.
With Slope Analysis, you can adjust the number of slope categories you require, define their slope, and select highly customized colors giving you flexibility in graphical output and slope ranges to help better inform you on the conditions of an existing or proposed site.
Lastly, there is an additional powerful option to Freeze or Unfreeze your Site Model Snapshot. Freeze will preserve the visual settings of any modifiers applied to a site model up until the point the Site Model Snapshot is created, allowing you to explore different design options or to visualize different construction phases. Unfreeze will automatically keep your Elevation or Slope Analysis and its Legend up to date with the latest modifications applied to your site model.
Plant Root Ball & Excavation Zone Improvements
Get better accuracy in your plans with improvements to Plant Root Ball and Excavation Zone settings. You'll see more customization options for both, giving you the ability to set top and bottom diameter dimensions for plant root balls as well as round and rectangular excavation zones. Work smarter within the heavily restricted confines of urban spaces and beyond, and clearly communicate with other project collaborators and installers.
Learn More about Vectorworks 2024
This post covers the landscape-specific features in Vectorworks 2024, but there are so many more additions to the software that will work wonders for your workflow. Make sure to look through the whole range of features and see what the new version can do for you.

